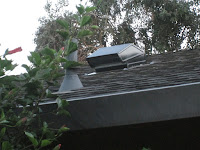
The old exhaust fan in our bathroom was on its last leg, after years of noisy inefficient venting it was time to put this energy hog to rest.
Before going out and buying a new exhaust fan we had to first figure out what CFM value was right for our space. Taking the bathrooms length, width, and height, we multiplied the three to find the cubic footage of the area (LxWxH= cu.ft.). Using a Bathroom Fan Sizing Chart, we matched our measurement to the recommended CFM value. Now we knew exactly what to look for.
There were three factors guiding our purchase of a new exhaust fan. First, the unit had to be energy efficient. An exhaust fan removed moisture and unpleasant odor, it should not require a lot of energy to accomplish this. Second, the unit had to be silent. With quieter well built exhaust fans these days there was no reason to settle for anything less. And finally, the fan had to be reasonably priced. The unit that best met these points was the Panasonic Whisper Ceiling.
With the replacement unit now chosen it was time to look at the existing ductwork. During inspection of the four inch corrugated duct we found areas that were punctured, compressed and pulled apart. It was clear the existing system would have to go.
The question now was, do we replace the existing ductwork with another four inch corrugated duct, or look for an alternative. After some online research and a call to a contractor friend we decided to go with a six inch smooth-tubed duct. Both the increase in size and the smoother inside would benefit the new exhaust fans performance.
Next, we had to determine where the six inch duct would be venting out at. Since the system had to exhaust directly to the outdoors aiming the ductwork to the nearest roof, eaves or gable vent wouldn't of been sufficient. The overall duct length was also important, having the total length remain as short as reasonably possible was necessary to avoid condensation in the line.
We would vent through the roof. To carryout this part of the process we went with a simple product called a roof cap. The roof cap provided a duct collar on the underside of the housing and was equipped with a secondary backdraft damper; keeping insects, critters and outside air from coming in.
The final missing piece of the new system was a switch. The existing system had originally been wired to the bathroom lights, so when the fan was on, so were the lights. The new switch would have to come on when a person entered the bathroom and remain on long enough for showers when needed. The solution, an occupancy sensor switch.
After everything was ordered and delivered demo was ready to begin. Bathroom power was shut off and the ceiling was taken down. Most exhaust fan installations DO NOT require removal of the ceiling, but because of mold and brittle drywall, the ceiling had to come down. The old exhaust fan and ductwork followed, after a lengthy clean up all traces of the old system were gone.
Before installing the new unit we had to mount the sliding brackets to the housing; the side that didn't have brackets was screwed to the underside of the ceiling joist while the other was secured to the adjoining ceiling joist.
With the fan housing now firmly in place we were ready for the new ductwork. A twenty-four inch piece of duct was attached to the housing from there a 90 degree elbow was added, followed by the riser that would eventually connect to the roof cap. The pieces were temporarily assembled so we could mark the underside of the roof and make the cut for the new roof cap.
Once the roof cap was installed the ductwork was reassembled for good. An aluminum joint tape was applied to lock all the ductwork together and seal the seams. We used a plastic putty knife to flatten down any remaining ripples in the joint tape; the putty knife was especially helpful around the 90 degree elbow seams that were harder to reach.
One of the biggest complaints about roof cap venting was outdoor noise echoing down the duct, so at the last minute we added a six inch duct insulation sleeve to help deaden some of those sounds. The top and bottom ends of the sleeve were also taped to keep it from sliding, the duct was then strapped to the rafter with a brace.
Once the ductwork was completed it was time to wire the exhaust fan. Opening the junction box, we removed one of the 1/2" concentric knockouts and inserted the snap-in bushing that came with the fan. The new conductors were then run through the bushing and each was wired to its respective place. Power to the bathroom was turned on so we could test the exhaust fan and help blow out any dust that accumulated inside, during installation.
The new exhaust fan worked perfectly. With power off again the occupancy sensor switch was then installed and adjusted using the schematics diagram that came with the switch. A bead of caulk was applied to the bottom opening of the exhaust fan housing and the ceiling drywall was installed. Normally caulk is applied on the back of the drywall in the attic but because our ceiling was removed we had to apply it from underneath.
I Hope you've enjoyed the article if you have any questions or comments please leave them below. On to the next.


No comments:
Post a Comment